Overview:
Relational Database Management Systems (RDBMS)
Almost all of the data used in ARC/INFO are stored in relational databases. Although a full treatment of the topic of relational databases goes beyond the scope of this course, we will at least need a brief introduction.
Tabular data are commonly held and manipulated in relational databases such as DBase, rBase, ACCESS, Oracle, and INFORMIX. The tables in these databases are often linked with relates, hence the name "relational" database. Attribute and associated tabular data in ARC/INFO are stored in the relational database INFO.
In relational database jargon, tables are known as tables, rows are known as records, and columns are known as items.
Central to the relational database model is the idea of linkages between tables. These are known as relates and joins. Common values for common items are used to associate records from one table to another. This image is an example of how tables are structured, and how links can be made between tables:
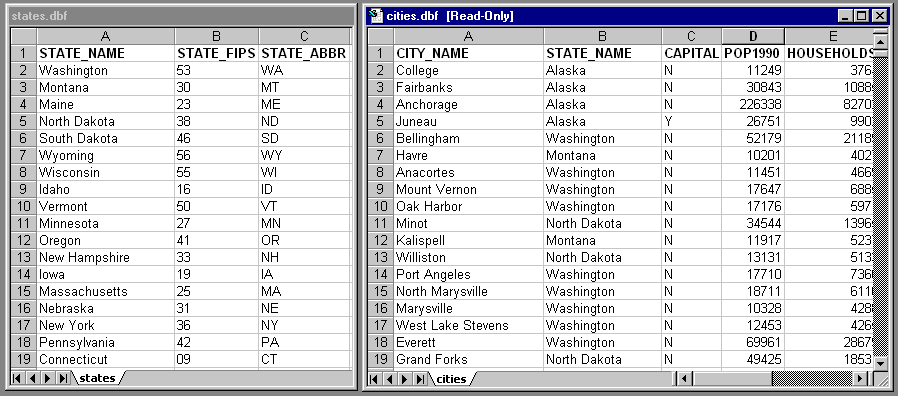
In the states table, items exist for state name, FIPS zone, and state
name abbreviation. A record exists for each state
In the cities table, items exist for city name, state, etc, and there is
a record for each city.
Because both tables contain the item "STATE_NAME," and the items appear to be defined in the same manner (free text), it should be possible to relate or join the tables based on the common value of this item.
There are a few special tables in ARC/INFO:
PAT = polygon or point attribute table
AAT = arc attribute table
NAT = node attribute table
VAT = value attribute table (for integer grids)
TAT = text attribute table (for annotations)
PATs always have a single record for each and every polygon or point in a coverage. The first 4 items in a PAT are always
Area
Perimeter
Cover#
Cover-id
AATs always have a single record for each arc in a coverage. The first 7 items are always
Fnode#
Tnode#
Lpoly#
Rpoly#
Length
Cover#
Cover-id
NATs only exist if BUILD has been performed with the NODE option. NATs have single records for each node, and always have the first 3 items
Arc#
Cover#
Cover-id
VATs exist only for integer grids. Instead of a single record for each cell, records refer to group of cells with the same value. A VAT always has the first 2 items
Value
Count
Where Value is the value of the zone, and Count is the number of cells with that value.
TATs only exist if BUILD has been performed on annotations. We will not cover annotations in this course.
ARC/INFO stores its tabular data in the RDBMS INFO. Tabular data are accessible in every module in ARC/INFO, although possible operations on the data differ in each module. the two main direct interfaces to tabular data are INFO itself and Tables. Data can also be manipulated in ArcPlot, GRID, and ArcEdit. In Arc, tables can be created, deleted, copied, and displayed, but records cannot be added or deleted.
In every ARC/INFO workspace there is a subdirectory called "info," which stores tabular data associated with spatial data sets. It is important that you never use system tools or commands to modify the contents of the info directory. Likewise, because spatial data sets are composed of their own subdirectory as well as files within the info directory, it is important that you do not use system tools or commands to move or delete spatial data sets. Instead, use the Arc commands COPY, RENAME, KILL , and EXPORT.
DIRECTORY LISTING of TABLES
To list the tables in a workspace's info directory, use the command:
Arc: dir info
 TYPE NAME                            INTERNAL NAME    NO. RECS LENGTH EXTERNL
------------------------------------------------------------------------------
  DF  TICCOV.TIC                        ARC0000DAT           4      12    XX
  DF  TICCOV.BND                        ARC0001DAT           1      16    XX
  DF  AEPOINT.TIC                       ARC0002DAT           4      12    XX
  DF  TICCOV.PAT                        ARC0003DAT           2      16    XX
  DF  AEPOINT.BND                       ARC0004DAT           1      16    XX
  DF  AEPOINT.PAT                       ARC0005DAT          66      82    XX
  DF  CLLINE.TIC                        ARC0006DAT           4      12    XX
  ...
This lists the tables in the current workspace as well as their system ("INTERNAL") name. It shows the number of records and the number of columns ("LENGTH"), and whether the file's pathname has been corrected (see commands EXTERNAL & EXTERNALALL).
LISTING TABLE ITEMS
To list the items present in a table, use the ITEMS command. It lists the
column numbers, items, storage and display width, data type, decimal places,
alternate name, and whether the item has been indexed.
COLUMN   ITEM NAME        WIDTH OUTPUT  TYPE N.DEC  ALTERNATE NAME     INDEXED?
    1  AREA                   4    12     F      3                        -
    5  PERIMETER              4    12     F      3                        -
    9  AEPOINT#               4     5     B      -                        -
   13  AEPOINT-ID             4     5     B      -                        -
   17  AEPTTYPE               2     2     I      -                        -
   19  AEPTNAME              40    40     C      -                        -
   59  AEPTVAL                5     5     I      -                        -
   64  AEPTDATE               8    10     D      -                        -
   72  AEPTICAO               4     4     C      -                        -
   76  AEPTDKEY               7     7     C      -                        -
LISTING TABLE RECORDS
To list the contents of tables, use the command LIST:
Usage: LIST <info_file> {from} {to} {item...item}
It is possible to specify a range of records ({from}, {to}) and items {{item...item}) to list if you are not interested in listing the entire table. If the listing is more than a screenfull, you will be prompted to complete the listing. To see the next screenfull, hit the space bar. To stop the listing, type N. If you enter a Y, the entire table will scroll across the screen without stopping. You can terminate this by hitting CTRL-C.
Arc: list aepoint.pat
              1
AREA                       =        0.000
PERIMETER                  =        0.000
AEPOINT#                   =     1
AEPOINT-ID                 =  8574
AEPTTYPE                   =  1
AEPTNAME                   = POWELL RIVER
AEPTVAL                    =   425
AEPTDATE                   = 05/02/1990
AEPTICAO                   = 1556
AEPTDKEY                   = AS25359
              2
AREA                       =        0.000
PERIMETER                  =        0.000
AEPOINT#                   =     2
AEPOINT-ID                 =  8361
AEPTTYPE                   =  4
AEPTNAME                   = COMOX
AEPTVAL                    =    84
AEPTDATE                   = 05/02/1990
AEPTICAO                   = 0451
AEPTDKEY                   = AG91151
Continue? n
Arc:
Many of the things you will need to do to tabular data will occur outside ARC/INFO. However, there are a few things you should be able to do within ARC/INFO. For a full treatment of these commands, see "Table management commands for creating and modifying data files" in the on-line documentation.
Adding items
To add an item to a table, use the ADDITEM command:
Usage: ADDITEM <in_info_file> <out_info_file> <item_name> <item_width>
               <output_width> <item_type> {decimal_places} {start_item}
Once the items are added, their values will be null if text, and 0 if numeric. You will need to update the value of new items before they are usable.
Dropping items
To drop one or more items from a table, use the DROPITEM.
Usage: DROPITEM <in_info_file> <out_info_file> {drop_item}
If you do not specify the item to drop, a dialogue will begin prompting you for multiple items to drop. Once an item is dropped, the change is instantaneous and irreversible, so use this command wisely.
Calculating new values
There are several options for calculating values tabular for items. In Tables,
INFO, ArcPlot, or ArcEdit, use CALCULATE, MOVEITEM, MOVE, UPDATE, CHANGE,
etc. Many of these commands are used in more than one module, each time
with different syntax. Make sure to check on usage before issuing these
commands.
Deleting records
In INFO and Tables, use the PURGE command to delete selected records from
tables. But never delete records from PATs, VATs, or AATs.
Doing this may corrupt your spatial data.
Selecting records
The basic commands for selecting records are ASELECT, NSELECT, and RESELECT.
These commands are available in all of ARC/INFO's modules, with the exception
of the Arc module (where RESELECT is the only command). Please look up the
usage for these commands, since a full treatment is not provided here. Make
sure and check out the references for how logical statements are composed.
RESELECT (REduceSELECT) reduces the selected set based on a logical statement.
ASELECT (AddSELECT) adds records to the selected set.
NSELECT exchanges the selected set and the unselected set.
Here are some examples of usage:
Arc: reselect streams type1 arc # arc
Arcplot: reselect soils soil_name in {'BARNESTON', 'WILKESON'} and SITE.INDEX > 100
Arcedit: reselect area > 500
ENTER COMMAND> RESEL DNR_TYPE = 1
Joins
It is common to permanently join tables which have common values for common
items. For example, you have a coverage called STREAMS, which has each arc
coded for its DNR stream type. You may also have another table (str_type.tab)
with descriptive data for each stream type. You may wish to permanently
join str_type.tab to streams.aat. To do this use the JOINITEM command.
Usage: JOINITEM <in_info_file> <join_info_file> <out_info_file> <relate_item>
                <start_item> {LINEAR | ORDERED | LINK}
	e.g.,
Arc: joinitem streams.aat str_type.tab streams.aat dnr_type dnr_type
This appends values from str_type.tab onto records in streams.aat where the value for dnr_type is the same in both tables. Where there is no match, new items will be null or 0.
Relates
Relates are temporary joins between tables. Relates are driven by common
values in related items from separate tables. For example, you may have
timber stand polygons coded with only a stand number in the PAT (stands.pat),
and all other stand-level data in a different table (timber_data.dat), also
coded by stand number. You may wish to add only the site index from the
related table. Using the combination of joinitem and relate, we can easily
accomplish this task:
Arc: additem stands.pat stands.pat site.index 3 3 i
Arc: tables
Enter Command> relate add
Relation Name: timber.rel
Table Identifier: timber_data.dat
Database Name: info
INFO Item: stand.no
Relate Column: stand.no
Relate Type: linear
Relate Access: ro
Relation Name <CR>
Enter Command> select stands.pat
Enter Command> calc site.index = timber.rel//site.index
Enter Command> quit
Note how items in the related table are referenced with the syntax "relate//item".
Relate remain active until removed or until the ARC/INFO session is terminated.
Displaying Tabular Data in a Spatial Context
There are several commands which will allow you to display tabular items
in the graphical display. In ArcPlot, these commands take the form of "featuretext"
where "feature" is in the set {point, arc, polygon, label}.
For example, to display the ownership type for the Pack Forest administrative
area:
Arcplot: labeltext bnd4 bnd4_type # cc
This will print the ownership type on top of the location of the label points.
All of these commands respect selections on tables, so if any features are RESELECTed, only attributes for those features in the selected set will be displayed.
In ArcEdit, you can display attribute items by using the TEXTITEM command:
TEXTITEM {cover}
<ARC | LABEL | TIC | NODE | ANNO.subclass | POLYGON | REGION.subclass |
SECTION.subclass | ROUTE.subclass> <NONE | item | string>
This will display attribute values on spatial features and is helpful when you are updating attribute values within ArcEdit.
![]() Back To Week 1 and Spatial Data Structures
| On to Week 3 and Topological Overlay
Back To Week 1 and Spatial Data Structures
| On to Week 3 and Topological Overlay![]()